Saturday, June 21, 2014

PWM based temperature controller using ATmega16A

Abstract: In this project we are going to design an embedded system that controls the temperature using a PWM signal, generated by a ATmega16A controller. 

Here we assume that our required temperature is 145 degrees C' and the bandwidth is ∆T= 20 degrees C. And also assume that it takes 10sec to heat up to 145 degrees C(this is not true in all cases). With  ∆T= 20 degrees C maximum temperature is 155 degrees C and minimum temperature would be 145 degrees C. Duty cycle can be calculated using the following formula..
                T_duty =1- (T_sensor – T0)/∆T
                   here T0=145 degrees C and T_sensor is the temperature sensor output
If you want to control higher temperatures, say above 150 degree C, then you have to use Thermistors instead of LM35. Here 10*T_duty gives the ON time duration and 10*(1-T_duty) gives the OFF time duration.

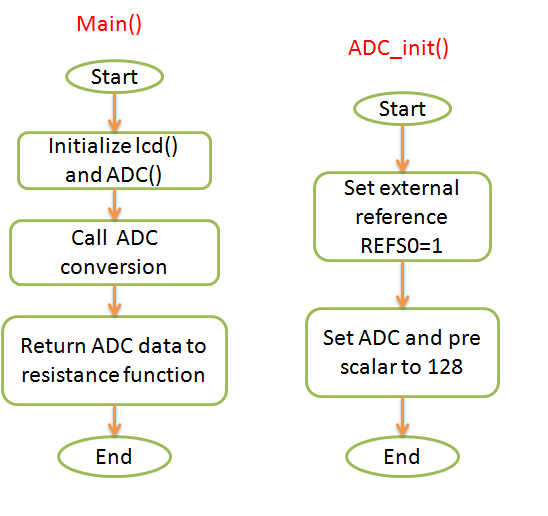
Operation:- The temperature sensor will sense the temperature of the device/chamber and a Nichrome wire used as a Heating element. Here LM35 is connected to the internal ADC0 pin of ATmega16A controller. ADC output will be the T_sensor value and is used to calculate the T_duty cycle period. PD0 pin carries the PWM signal, is connected to the Nichrome wire. If there is a change in temperature T_duty will change and the PWM will change. Example, if the temperature is higher than the required then the T_duty (ON time) will be reduced and OFF time will be increased to cool down the temperature. If the temperature is lower than the required then the T_duty (ON time) will be increased and OFF time will be reduced to increase the temperature.   
When the temperature is 144 degrees C 
       T_duty = 1-(144 - 135)/20 = 0.55*10=5.5sec = ON time
       1-T_duty = 1-0.55= 10*0.45=4.5sec = OFF time
 When the temperature is 150 degrees C 
       T_duty = 1-(150 - 135)/20 = 0.2*10=2.5sec = ON time
       1-T_duty = 1-0.25= 10*0.7=7.5sec = OFF time

Flow chart:-   to download the source code

NOTE: The time required to heat up to a required temperature will depend on the type of heating material used. Calculate the time required and use it to generate PWM. 


Saturday, June 14, 2014

Wheatstone bridge application using ATmega16A

Abstract: In this project we are going to build a circuit that calculates the unknown resistance in a Wheatstone bridge using voltage subtractor and Internal ADC of a ATmega16A.

Wheatstone bridge is used to calculate the unknown resistance in a circuit. Here we are using OpAmp based subtractor circuit to calculate the voltage 'Vg', which is used to calculate the unknown resistance. The two buffer amplifiers are used to provide virtual isolation between the wheatstone bridge and the subtractor. Below circuit shows the working of a subtractor,


NOTE: In case of ATmega16A we don't need to use external subtractor because ATmega16A is having differential input mode.

Here we selected external ADC reference voltage 5V. So, the output of a ADC value is multiplied with its resolution to get input voltage, 5/1024. This voltage is given as 'Vg' in wheatstone bridge equation to calculate the resistance, remaining three resistors are set to 1k ohm.

Here's the program flow


  to download the code

Working images of the total circuit


Click here to see the working video.


Saturday, March 15, 2014

How to Embed/Integrate the Circuit?

This is for those who doesn't know how to solder/integrate/Embed their circuits/system on to the Veroboard/PCB/Vector board. Many new people do the same mistake 

- first they will solder every thing and they inserts all ICs in it, after that once they switch on the power supply   they will experience short circuit, higher voltage, low voltage and IC burning problems. 

- These problems are due the lack of knowledge in design.

- Follow these steps to avoid such kind of problems 

1. Be ready with your working circuit, components, digital multimeter, soldering iron, etc.,

2. In any circuit first solder the power supply, it may be from AC to DC or DC to DC.

3. Check the input, output and intermediate voltages(in case of many stages) with Digital Multimeter(DMM).
    Verify the measured voltages with required voltages. If not, verify the connections and see whether you         connected the same component or not. If you get the required voltages then proceed to the next step,           otherwise don't proceed until you rectify the issue because this will cause to major problems further.


4. Now First solder the IC bases and give only Power supply connections to the base. Check the voltage in each and every pin with respect to the ground pin. If you get the required voltages proceed to the next step,   otherwise verify the connections.Make sure that ICs are not inserted in to the bases.


5. Connect the other components like resistor, capacitor networks and relays etc., check the input and output of each sub network individually. If you get the satisfied voltages then integrate them together. Check for the entire circuit voltages at each pin with respect to the ground pin. Check for the connection if you get undesired results. Make sure that ICs are not inserted in to the bases.


6. If you are sure that you are getting all desired voltages you can insert ICs in it. Check the connectivity of each pin with multimeter to identify whether there is any loose contact or short circuit contact.


If all the connections and input output voltages are correct but still if the functionality is wrong then make sure that IC is working properly or not and check for the programming errors.